How to Prevent Skype Auto-Start in Windows 10 – 6 Methods
ByPalla SridharPosted onUpdated on
Last Updated:
Skype in 2020 has different versions. There are two versions of Skype: There are two versions of Skype: Skype for Desktop and Skype for Mobile.
There is also a business purpose app.
Windows 10 users are confused with Skype. There are two types: 1. Skype App (UWP). 2. Classic Skype Application.
Each Skype type has a different method of stopping automatically in Windows 10.
Programs and apps starting automatically in Windows 10 take some CPU and RAM power. This can slow things down, like opening menus slowly, apps not starting quickly, problems while working with office apps etc.
To stop the Skype app from running automatically in Windows 10, you need to sign out. This approach approach is the best possible solution.
If you are using the traditional Skype application or program, you can untick the option “Start Skype when I start Windows.”
To know the difference between the Skype app and the Classic Skype program, you can see the notification area.
The above picture with the S icon indicates “Skype Store or UWP app.”
The above image with the “green tick mark” indicates the Skype program is running.
In this post we are going to see 6 methods to prevent Skype from starting automatically in Windows 10.
Table of Contents
1. Task Manager
The Task Manager is the first weapon against this issue. In Windows 10, you can disable programs in the “Startup” tab. This method works out in the older versions of Skype. In the new version, it doesn’t show as a startup item.
Temporarily you can kill Skype-related tasks. But this action will not stop Skype from automatically running again.
There are 3 Skype-related programs running in Windows 10 version 1909. They are the following: 1. SkypeApp.exe 2. SkypeBackgroundHost.exe 3. SkypeBridge.exe
These 3 programs or services need to be disabled to prevent Skype from starting again on autostart. You need to provide some permissions to the folder containing these files.
But this is a little complicated and can cause security breaches. So it’s better you follow the next method.
2. Sign out from the Skype app.
Follow these steps. 1. Press the profile pic on the app. 2. You should see “Sign out” in the next pop-up. 3. Click it. 4. You are shown some informational messages. 5. Then “Sign out.”
This is the best method suited for the Skype UWP app. It is commonly found in the Microsoft Store. It comes pre-installed with the Windows 10 version.
3. Turn off the Skype Background App
As per this Microsoft Answers web page, the Skype UWP app, or Store app, has never been present in the Startup tab of Task Manager in Windows 10. Windows 10 handles Store apps differently. This behavior is unlike the traditional Win32 applications.
1. Press the Win + I key to open Settings. 2. Click on Privacy. 3. Scroll through until you see “Background apps.” 4. On the right-hand side, you should see “Skype.” 5. Turn off the slider to prevent the Skype Background app from running.
If you close your computer without signing out of the Skype UWP application, then on the next computer boot, Skype will auto-run in the background. To maximize Skype UWP, you will just need to click on the application icon.
But there is a disadvantage with this kind of operation. When apps run in the background, they show live tiles, download new data, and receive notifications. These functions may fail if you disable the Skype app service.
4. Uninstall Skype UWP app for Windows 10
In some of the posts, users were dissatisfied with the Skype UWP app. This causes a resource hog on some versions of Windows 10. As an alternative, you can install the Skype application and uninstall the Skype app.
For this, follow these steps.
1. Press the Win + I key to open Settings. 2. Then click on Apps. 3. Click on “Apps & features.” 4. On the right-hand side, scroll through till you see the Skype app. 5. Click it, and you can see the “Uninstall” button.
If the Skype app is already running, you need to terminate the related process using “Advanced Options.” Click that option. Next click on the “Terminate” button. This will “immediately terminate this app and its related processes.”
5. Using Batch file
The batch file is another method to terminate the Skype app processes on computer restart.
1. Select any folder on your computer. 2. Create a .bat file. 3. Then add a line to it—taskkill /f /IM skype* 4. Create a shortcut to it. 5. Place it in the “Startup” folder of your profile.
This batch file will automatically run every time the computer starts. This code will terminate the Skype app and its related background apps.
It will also log in to your Skype account every time your computer starts. You can still launch the app in the normal way.
The Skype app typically took around 330 MB of RAM memory on my system.
There were 4 sub-processes below the name of Skype under the Processes tab. 1. Microsoft Skype 2. Runtime broker 3. Skype 4. SkypeBridge
The CPU resource was negligible compared to other apps. But “Skype” sub-processes take the majority of RAM resources.
To limit this resource usage, you can manually close the Skype app from the Notification Center. It automatically closes the majority of Skype processes in Task Manager.
6. Stop the classic Skype application for Windows from starting automatically.
You can easily install the Skype for Desktop application or program using the link below.
The current install file size is around 69 MB for 64-bit Windows 10. The current version is 8.58 as of April 2020. The Skype program app only takes around 150 MB of memory usage on my computer.
This is 50% less than the Skype app of Windows 10. As mentioned earlier, it is better to uninstall the Skype app and use the classic Skype application if you are low on CPU and RAM resources.
If you have both the Skype app and the desktop program installed, you will see a similar interface.
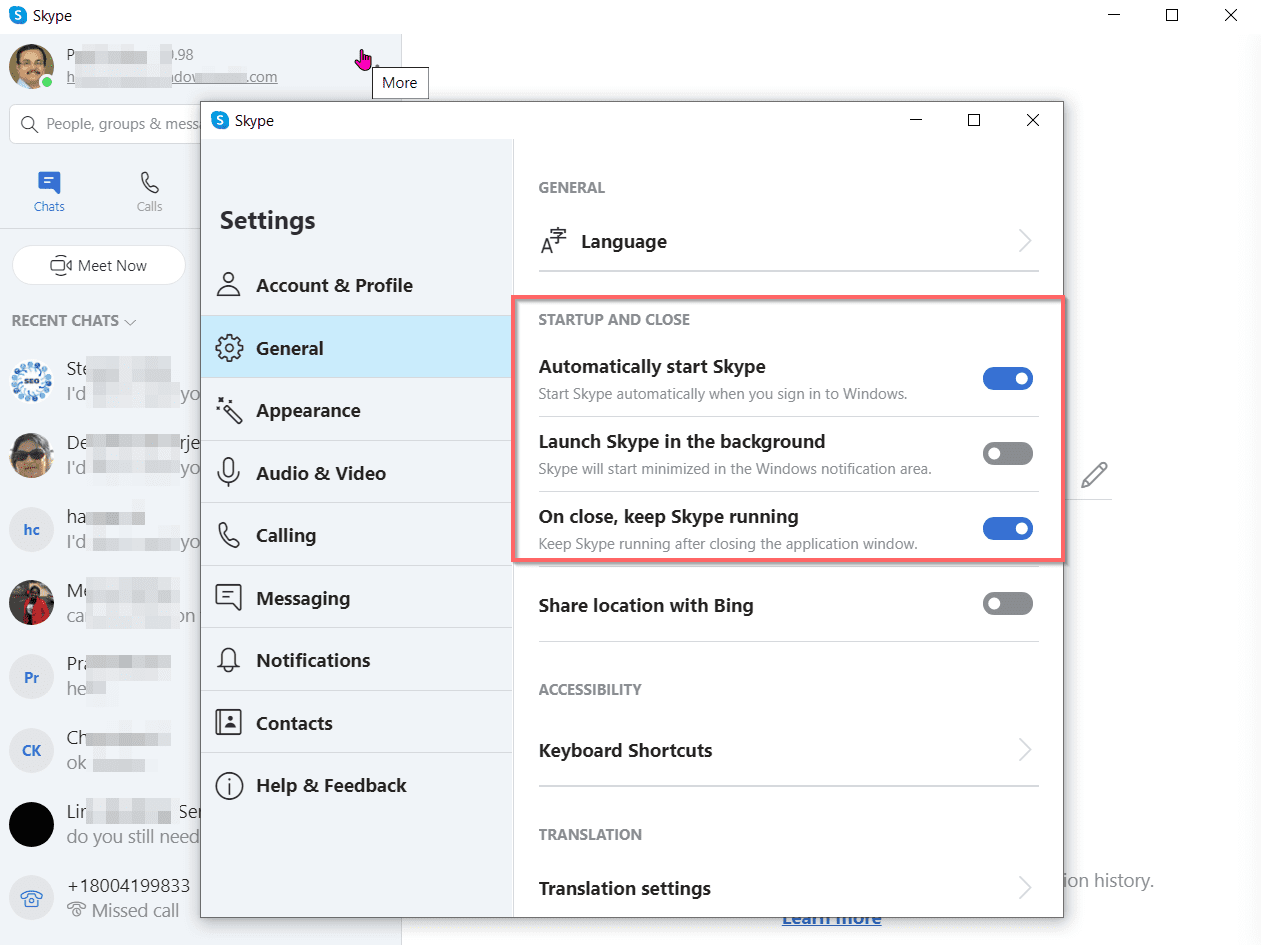
1. Click the 3 horizontal dots at the top. 2. Then “Settings.” 3. Click on “General” on the pop-up window. 4. Toggle off the option “Automatically start Skype.”
Then restart your laptop or PC to check whether the Skype program has stopped from starting automatically.
There are two more options here. 1. Launch Skype in the background. 2. On close, keep Skype running.
Turn off these two settings.
This should completely disable Skype from automatically starting in Windows 10.
Click to rate this post!
[Total: 0 Average: 0]
Palla Sridhar
Palla Sridhar is the CEO of DigiPalla IT Services LLP and a seasoned ex-IT professional with over 15 years of blogging experience. He specializes in Microsoft products, including Windows 10, Windows 11, and Office 365, with deep expertise in error code solutions, computer repair, and IT troubleshooting. He publishes practical guides that help everyday users and professionals solve real tech problems quickly and confidently.

 The above image with the “green tick mark” indicates the Skype program is running.
 These 3 programs or services need to be disabled to prevent Skype from starting again on autostart. You need to provide some permissions to the folder containing these files.
 This is the best method suited for the Skype UWP app. It is commonly found in the Microsoft Store. It comes pre-installed with the Windows 10 version.
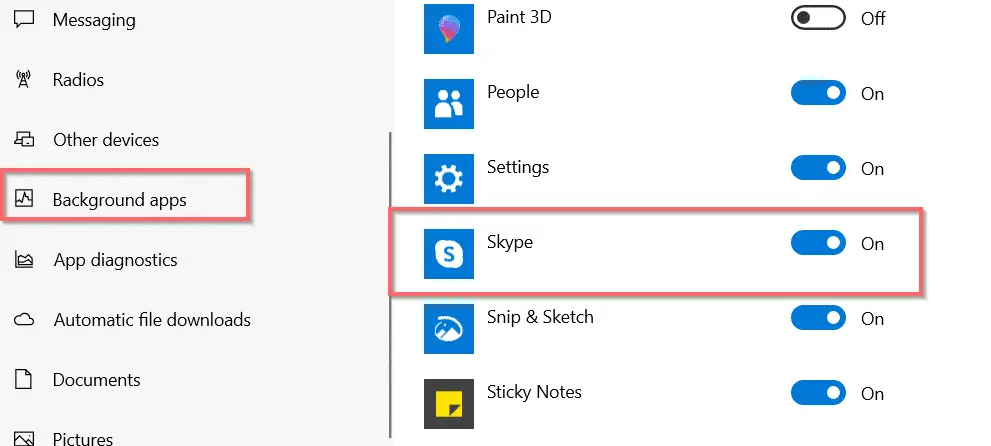
 If the Skype app is already running, you need to terminate the related process using “Advanced Options.” Click that option. Next click on the “Terminate” button. This will “immediately terminate this app and its related processes.”

 The CPU resource was negligible compared to other apps. But “Skype” sub-processes take the majority of RAM resources.
 The current install file size is around 69 MB for 64-bit Windows 10. The current version is 8.58 as of April 2020. The Skype program app only takes around 150 MB of memory usage on my computer.
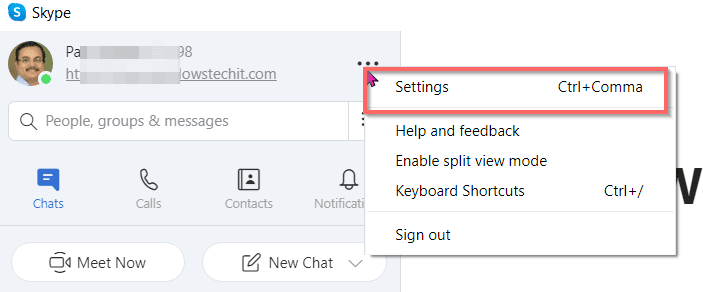
 Then restart your laptop or PC to check whether the Skype program has stopped from starting automatically.